
Руководство по эксплуатации Fujitsu PLASMAVISION P42VHA40R — ManualsBase.com
Краткое содержание страницы № 1
MHD01695_E.book 1 ページ 2005年2月1日 火曜日 午後7時7分
USER’S MANUAL
(Specification and Part Names)
WIDE PLASMA DISPLAY
P42VHA40W/P42HHA40W/P50XHA40W/P55XHA40W/
P63XHA40W
P42VHA40U/P42HHA40U/P50XHA40U/P55XHA40U/
P63XHA40U
P42VHA40A/P42HHA40A/P50XHA40A/P55XHA40A/
P63XHA40A
P42VHA40R/P63XHA40R
Contents
Page
Before Use
• CHECKING ACCESSORIES………………………………………………………………………… E-2
• INSTALLATION …………………………………………………………
Краткое содержание страницы № 2
MHD01695_E.book 2 ページ 2005年2月1日 火曜日 午後7時7分 CHECKING ACCESSORIES Two big One power cable Two small Three user’s manuals One remote control One remote control ferrite cores ferrite cores (for the W/A/R models) (for the U model) Manual Manual Manual No. :ZCAT1518-0730 No.:SFT-72SN Mfr.:TDK Mfr.:TKK Two AA batteries One residential warranty (for the A model) CONNECTING THE DISPLAY TO EXTERNAL EQUIPMENT Carefully check the terminals for position and type before making any connections. Loose c
Краткое содержание страницы № 3
MHD01695_E.book 3 ページ 2005年2月1日 火曜日 午後7時7分 INSTALLATION To prevent the display’s internal components from overheating, make sure that the display is installed in a well-ventilated location. Be sure to use the optional stand, wall-mounting unit or the other unit when installing the display. Also, be also sure that your dealer performs the installation. See the appropriate instruction manual for more information on the installation hardware you select. To prevent an accident and ensure safety i
Краткое содержание страницы № 4
MHD01695_E.book 4 ページ 2005年2月1日 火曜日 午後7時7分 PART NAMES AND FUNCTIONS DISPLAY SECTION – FRONT Power indicator lamp (Right section) This lamp shows the state of the power supply.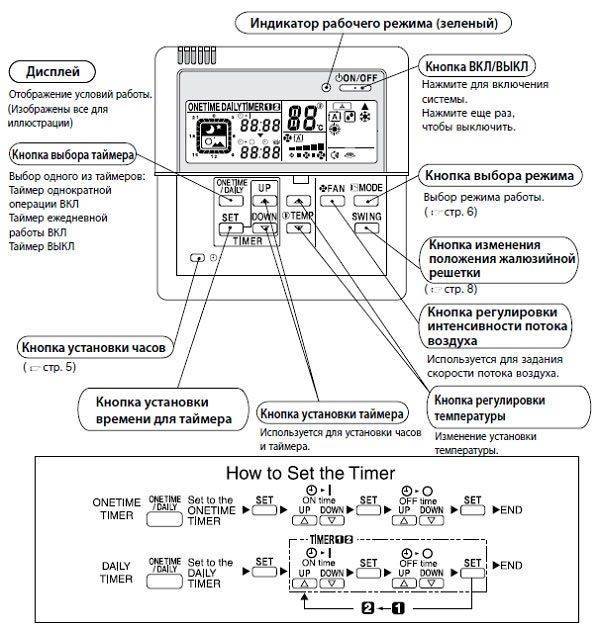
Краткое содержание страницы № 5
MHD01695_E.book 5 ページ 2005年2月1日 火曜日 午後7時7分 DISPLAY SECTION – BACK AND BOTTOM PART Back Bottom / I power switch If this button is pressed when the power indicator lamp is off, the indicator lamp will light. The power can be turned on and the standby mode selected by using the remote control or the control panel of the display. If this button is pressed when the power indicator lamp is lit, the indicator lamp will go out. *Power is still supplied to parts of the display even if the indicator
Краткое содержание страницы № 6
MHD01695_E.book 6 ページ 2005年2月1日 火曜日 午後7時7分 PART NAMES AND FUNCTIONS (Continued) RGB2 input terminal (RGB2 INPUT/mD-sub) for the W/U/A models / RGB1 input terminal (RGB1 INPUT/mD-sub) for the R model Connect this terminal to the PC’s display (analog RGB) output terminal or decoder (digital broadcast tuner, etc.
Краткое содержание страницы № 7
MHD01695_E.book 7 ページ 2005年2月1日 火曜日 午後7時7分 DESCRIPTION OF INPUT TERMINALS DVI-D terminal (RGB1 INPUT/DVI-D) Pin No. Signal Pin No. Signal Pin No. Signal for the W/U/A models 1 T.M.D.S. Data2– 9 T.M.D.S. Data1– 17 T.M.D.S. Data0– 2 T.M.D.S. Data2+ 10 T.M.D.S. Data1+ 18 T.M.D.S. Data0+ 3 T.M.D.S. Data2 11 T.M.D.S. Data1 19 T.M.D.S. Data0 Shield Shield Shield 4— 12 — 20 — 5— 13 — 21 — 6 DDC Clock 14 +5V Power 22 T.M.D.S. Clock Shield 7 DDC Data 15 Ground (for +5V) 23 T.M.D.S. Clock+ 8 — 16 Hot
Краткое содержание страницы № 8
MHD01695_E.book 8 ページ 2005年2月1日 火曜日 午後7時7分 PART NAMES AND FUNCTIONS (Continued) HDMI input terminal (VIDEO5 INPUT/HDMI) Pin No. Input signal Pin No. Input signal for the U model 1 T. M.D.S. Data2+ 11 T.M.D.S. Clock Shield 2 T.M.D.S. Data2 Shield 12 T.M.D.S. Clock– 3 T.M.D.S. Data2– 13 CEC 4 T.M.D.S. Data1+ 14 Reserve 5 T.M.D.S. Data1 Shield 15 DDC Clock 6 T.M.D.S. Data1– 16 DDC Data 7 T.M.D.S. Data0+ 17 Ground (for +5V) 8 T.M.D.S. Data0 Shield 18 +5V Power 9 T.M.D.S. Data0– 19 Hot Plug Detect
Краткое содержание страницы № 9
MHD01695_E.book 9 ページ 2005年2月1日 火曜日 午後7時7分 OPTIONS Wall-mounting Bracket 0° to 15° mounting angle P-WB4201 (for 42” model/50” model) P-WB6300 (for 55” model/63” model) Ceiling unit 0° to 15° mounting angle P-CT4200 (for 42” model/50” model) P-CT6300 (for 55” model/63” model) Desktop Stand unit P-TT4202 (for 42” model/50” model/55” model) P-TT6300 (for 63” model) Speaker P-SP1000 (for attaching to the display) for (1 set of 2 speakers) 42” model/50” model P-SP5010 (for attaching to the displa
Краткое содержание страницы № 10
MHD01695_E.book 10 ページ 2005年2月1日 火曜日 午後7時7分 MAIN SUPPORTED SIGNALS This display can store the latest four types of signals for RGB adjustment value. The fifth input signal will replace the adjustment value of the first input signal. To do this, select a desired signal and follow the instructions in “Adjusting Screen Position and Size” on the User’s manual (2/2) to adjust the parameters. When you finish, the settings will be automatically stored. Thus, when the display receives that signal,
Краткое содержание страницы № 11
MHD01695_E.book 11 ページ 2005年2月1日 火曜日 午後7時7分 In the Comp.video and Video/S-video, the display has been factory-set as follows for different input signals: Main corresponding signals (Comp.video mode) Main corresponding signals (Video, S-video mode) Horizontal Vertical Horizontal Vertical Signal HDMI Signal frequency (kHz) frequency (Hz) frequency (kHz) frequency (Hz) 15.73 59.94 SDTV 480i 15.73 59.94 NTSC 15.63 50.00 SDTV 576i 15.63 50.00 PAL 31.47 59.94 SDTV 480p 15.63 50.00 SECAM 31
Краткое содержание страницы № 12
MHD01695_E. book 12 ページ 2005年2月1日 火曜日 午後7時7分 SPECIFICATION WIDE PLASMA DISPLAY Model P42VHA40W/A P42HHA40W/A P50XHA40W/A P55XHA40W/A P63XHA40W/A Screen size 42″ wide screen: 42″ wide screen: 50″ wide screen: 55″ wide screen: 63″ wide screen: 92.1 cm (W) x 51.8 92.2 cm (W) x 52.2 110.6 cm (W) x 62.2 122.9 cm (W) x 69.1 139.3 cm (W) x 78.3 cm (H) cm (H) cm (H) cm (H) cm (H) (105.7 cm diagonal) (106.0 cm diagonal) (126.9 cm diagonal) (140.0 cm diagonal) (159.8 cm diagonal) 36.3 inch (W) x 20.4 3
Краткое содержание страницы № 13
MHD01695_E.book 13 ページ 2005年2月1日 火曜日 午後7時7分 WIDE PLASMA DISPLAY Model P42VHA40U P42HHA40U P50XHA40U P55XHA40U P63XHA40U Screen size 42″ wide screen: 42″ wide screen: 50″ wide screen: 55″ wide screen: 63″ wide screen: 92.1 cm (W) x 51.8 92.2 cm (W) x 52.2 110.6 cm (W) x 62.2 122.9 cm (W) x 69.1 139.3 cm (W) x 78.3 cm (H) cm (H) cm (H) cm (H) cm (H) (105.7 cm diagonal) (106.0 cm diagonal) (126.9 cm diagonal) (140.0 cm diagonal) (159. 8 cm diagonal) 36.3 inch (W) x 20.4 36.3 inch (W) x 20.6 43.5
Краткое содержание страницы № 14
MHD01695_E.book 14 ページ 2005年2月1日 火曜日 午後7時7分 SPECIFICATION (Continued) WIDE PLASMA DISPLAY Model P42VHA40R P63XHA40R Screen size 42″ wide screen: 63″ wide screen: 92.1 cm (W) x 51.8 cm (H) (105.7 cm diagonal) 139.3 cm (W) x 78.3 cm (H) (159.8 cm diagonal) 36.3 inch (W) x 20.4 inch (H) (41.6 inch diagonal) 54.8 inch (W) x 30.8 inch (H) (62.9 inch diagonal) Aspect ratio 16:9 (wide) Number of pixels 852 (H) x 480 (V) 1366 (H) x 768 (V) Weight 31.5 kg / 69 lbs 72 kg / 159 lbs Outer dimensio
Краткое содержание страницы № 15
MHD01661-01_E.book 1 ページ 2004年11月16日 火曜日 午後4時33分 USER’S MANUAL (Precautions and Adjustment Methods) WIDE PLASMA DISPLAY Contents Page Page Before Use • OTHER ADJUSTMENTS …………………………………….E-29 • INFORMATION …………………………………….. …………….E-2 • INITIALIZATION OF USER ADJUSTMENT VALUE ..E-35 Usage Others • USING THE REMOTE CONTROL………………………….E-3 • CLEANING AND MAINTENANCE ………………………..E-36 • CONNECTING THE D
Краткое содержание страницы № 16
MHD01661-01_E.book 2 ページ 2004年11月16日 火曜日 午後4時33分 INFORMATION • Receptacle Make sure that the power cable’s grounding wire is grounded. The display comes with a 3-prong power plug; one prong is connected to the grounding wire. If you have only a 2-hole receptacle, you will need to have it replaced. Contact your dealer for more information. • Have the display inspected and cleaned by your dealer at regular intervals. • Pictures may become “burnt” into the screen phosphors if the screen is lef
Краткое содержание страницы № 17
MHD01661-01_E.book 3 ページ 2004年11月16日 火曜日 午後4時33分 USING THE REMOTE CONTROL REMOTE CONTROL (for the W/R models) For details, see page .
Краткое содержание страницы № 18
MHD01661-01_E.book 4 ページ 2004年11月16日 火曜日 午後4時33分 USING THE REMOTE CONTROL (Continued) REMOTE CONTROL (for the U model) For details, see page . button E-12 Switches between Power On and Standby. (MUTE button) E-13 Temporarily mutes the audio. To return the audio to normal, press this button once again, or press the does the work also. (DISPLAY button) E-16 Press this button to display the input mode, and screen size status. The status is displayed for about five seconds. (PICTU
Краткое содержание страницы № 19
MHD01661-01_E.
Краткое содержание страницы № 20
MHD01661-01_E.book 6 ページ 2004年11月16日 火曜日 午後4時33分 USING THE REMOTE CONTROL (Continued) EFFECTIVE RANGE FOR THE REMOTE CONTROL Point the remote control at the display’s signal receiver when using it. Make sure that there are no obstacles between the remote control and the display’s signal receiver. Upper 20° 20° Lower Left Right 30° 30° 5 m (Front) Note The remote control may not function properly if you use a high-frequency fluorescent lamp. If you experience problems, move the lamp or use the
Watching pictures on the wide screen, Switching between screen sizes, Watching pictures on the wide screen…. e-17
40 pages of detailed instruction manual and user guide of exploitation
07:13
Plasma TV Repair Tutorial — Common Symptoms & Solutions — How to Fix Plasma TVs
03:15
Fujitsu P42HHA30ES: écran Plasma
02:08
PDS4203W-H Fujitsu Plasma 42″ Display for sale at cfusion.com
04:48
Road Side Find Broken Fujitsu p42vca30eh 42 inch Plasma screen VGA + S Video & Autopsy
00:15
Fujitsu PlasmaVision TV 3D Model
00:37
FUJITSU Plasmavision PDS4213E-H
05:56
Plasma TV No Picture No Sound Fix
00:13
Fujitsu PlasmaVision TV 3D Model
E-17
- Image
- Text
- Outline
E-17
Engli
s
h
Deutsch
Es
pa
ñol
Fran
ç
ai
s
It
al
iano
Por
tugu
ê
s
日
本 語
Pус
с
к
и
й
中文
WATCHING PICTURES ON THE WIDE SCREEN
SWITCHING BETWEEN SCREEN SIZES
1
Press
.
The currently selected mode will appear.
2
Press
to select a desired Screen
Size.
Each time you press
, a different Screen Size
appears. The sequences used are as follows:
When you are in a Video input mode
When you are in an RGB input mode
* Depending on the type of signal, some aspects
may not be selected.
* You can also use the buttons
on the display’s control
panel to perform these steps.
(Ex. the W/R models)
Normal mode
Wide1 mode
Note
• Displaying a picture in a Normal mode for extended periods of time may cause phosphor burn-in.
• A variety of Screen Sizes are available with this display. Remember that if you select a mode with an aspect ratio (ratio of frame width to frame
height) different from that of the TV program or video media, the pictures will appear differently than if you had selected a mode having the same
aspect ratio.
• Showing a movie or similar premium event at a different aspect ratio from its original one at any event site, restaurant, or bar for profit-making
purposes or for a public audience may constitute a copyright infringement.
For films, try to select a mode having the same aspect ratio as the original picture; this enables the director’s original intentions to be preserved.
• See P.
E-27
for how to adjust the picture size and position.
MHD01661-02_E.book 17 ページ 2004年12月22日 水曜日 午後5時15分
- CHECKING ACCESSORIES
- CONNECTING THE DISPLAY TO EXTERNAL EQUIPMENT
- INSTALLATION
- PART NAMES AND FUNCTIONS
- DISPLAY SECTION — FRONT
- DISPLAY SECTION — Back and bottom PART
- Description of Input Terminals
- OPTIONS
- MAIN SUPPORTED SIGNALS
- SPECIFICATION
- 183VD_COM_E04.pdf
- information
- Using the Remote Control
- Remote Control (for the W/R models)
- Remote Control (for the U model)
- PUTTING BATTERIES IN THE REMOTE CONTROL
- Precautions
- Effective Range for the Remote Control
- Connecting the Display to External Equipment
- Example of Connection to External Components
- VCR
- DVD RECORDER/PLAYER
- Satellite Tuner
- PC
- Basic Operations
- TURNING THE POWER ON AND STAND-BY
- Adjusting the Volume
- Selecting Input Mode
- Video Input Mode (for the W/R models)
- Video Input Mode (for the U model)
- RGB input mode
- Other Basic Operations
- Convenient Functions
- Watching Pictures on the Wide Screen
- Switching between Screen Sizes
- Screen Size
- Aspect Ratio
- Adjustment Menu
- BASIC PROCEDURE OF ADJUSTMENT MENU OPERATIONS
- Adjusting the picture
- Precision Setting (for the U model)
- Adjusting Screen Position and Size
- Adjusting Audio
- Other Adjustments
- Adjustment
- ON SCREEN MENU
- SETTING THE INPUT TERMINALS
- Other Settings
- Initialization of User Adjustment Value
- Cleaning and Maintenance
- before obtaining service
Screen size, Aspect ratio, Watching pictures on the wide screen (continued)
E-18, Screen size aspect ratio
- Image
- Text
E-18
WATCHING PICTURES ON THE WIDE SCREEN (Continued)
Normal (Video/RGB)
Displays pictures of normal size (i. e., a 4:3 aspect ratio).
Wide1 (Video)
Displays natural-looking pictures of standard size on the wide screen.
Wide2 (Video)/Wide (RGB)
Ideal for displaying vertically extended pictures such as squeezed pictures.
Zoom1 (Video)/Zoom (RGB)
Enlarges horizontally extended pictures equally in all directions to maintain the aspect
ratio constant.
Zoom2 (Video)
Reduces the height of horizontally extended pictures with captions, without eliminating
the caption. Only the height of pictures is reduced, not the height of the caption.
(Captions may not be easy to read, however, depending on the picture.)
The following aspect ratios are available.
4:3 aspect ratio
16:9 aspect ratio
(VHF/UHF broadcasting, BS broadcasting)
(HDTV broadcasting)
1.85:1 aspect ratio
2.35:1 aspect ratio
(Vista Vision size)
(Cinema Vision size)
SCREEN SIZE
ASPECT RATIO
Picture of
standard size
Wide1
Vertically
extended picture
Wide2
Horizontally
extended picture
Zoom1
Horizontally extended
picture with caption
Zoom2
4
3
16
9
1. 85
85
1
2.35
1
Note
You may find dark areas on top and at the bottom of the screen if you select one of the Zoom modes for media while using the Vista Vision or Cinema
Vision size i.e., the sizes used frequently for picture software.
• Functions may not be available with some models and some device options.
MHD01661-02_E.book 18 ページ 2004年12月22日 水曜日 午後5時15分
E-19–e, E-19, Es pa, Fran, Ai s, Por tugu
- Image
- Text
E-19
Engli
s
h
Deutsch
Es
pa
ñol
Fran
ç
ai
s
It
al
iano
Por
tugu
ê
s
日
本 語
Pус
с
к
и
й
中文
ADJUSTMENT MENU
The numbers in parentheses ( ) indicate the reference page numbers.
MENU
PICTURE
(E-20)
Signal Contrast
(E-21)
POSITION/SIZE (E-27)
Drive Contrast
(E-21)
Black Level
(E-23)
AUDIO
(E-28)
Brightness
(E-21)
Detail Gradation (E-23)
FEATURES
(E-29)
Color
(E-21)
3D NR
(E-23)
FACTORY DEFAULT(E-35)
Tint
(E-21)
CODEC NR
(E-23)
Sharpness
(E-21)
Image Enhance
(E-24)
Chroma Transient (E-24)
Ambient Sensor (E-21)
Color Temp.
(E-24)
Image identify
(E-24)
Picture Mode
(E-22)
User Color Temp. (E-24)
PrecisionSetting (E-22)
Color Focus
(E-25)
Picture Memory
(E-22)
Progressive Scan (E-26)
24 Frame Mode
(E-26)
Default
30 Frame Mode
(E-26)
Jaggies Filter
(E-26)
Position
(E-27)
Motion Setting
(E-26)
Size
(E-27)
Default
Treble
(E-28)
Bass
(E-28)
Balance
(E-28)
Loudness
(E-28)
Adjustment
(E-29)
Dot Clock
(E-29)
On Screen Menu (E-30)
Clock Phase
(E-29)
Input Terminal
(E-31)
Clamp Position
(E-29)
Others
(E-32)
Auto Calibration (E-29)
OSD
(E-30)
Language
(E-30)
Name Select
(E-30)
Video Input
(E-31)
S-video Input
(E-31)
D-SUB Input
(E-31)
Auto Off-NO SIG. (E-32)
Audio Input
(E-32)
Screen Orbiter
(E-33)
Direct Setting
(E-33)
Code Setting
(E-33)
White Screen
(E-33)
Exhibition Mode (E-34)
Information
(E-34)
Note
• The shaded menu items are applied to the U model only.
• Some type of signal can not be selected.
MHD01661-02_E.book 19 ページ 2004年12月22日 水曜日 午後5時15分
Page 34
- Image
- Text
E-20
BASIC PROCEDURE OF ADJUSTMENT MENU OPERATIONS
• Below is shown the basic procedure to make changes to the options in the ADJUSTMENT MENU. (Ex.: adjusting tint setting (Tint))
1
Press
;
.
The main menu screen will appear.
2
Press
E
or
F
to select “PICTURE”.
Each time you press
E
or
F
, one of the available
menus appears in the following sequence:
PICTURE < POSITION/SIZE < AUDIO < FEATURES <
FACTORY DEFAULT
The PICTURE Menu screen will appear.
3
Press
C
or
D
to select “Tint”.
4
Press
<
.
The “Tint” adjustment screen will appear.
5
Press
E
or
F
to change tint values.
F
: More greenish colors
E
: More purplish colors
6
Press
<
to store.
7
Press
;
when you finish.
* Repeat steps 3, 4, 5 and 6 when you wish to make
changes to other options.
* When
<
is pressed after you have selected
“Default”, the settings are returned to those that
were valid when you purchased the set.
* Press
;
to halt the operation in progress.
(Ex. the W/R models)
“PICTURE” selected in the main
menu screen
“Tint” selected in the PICTURE
Menu screen
“Tint” adjustment screen
Note
• On-screen information disappears if you do not take any action for about 60 seconds.
• Functions may not be available with some models and some device options.
• The adjustment range varies with the display signal. You can adjust the display quality to the value you want within the adjustable range.
MHD01661-02_E.book 20 ページ 2004年12月22日 水曜日 午後5時15分
Adjusting the picture, E-21), E-21
Page 35
- Image
- Text
E-21
Engli
s
h
Deutsch
Es
pa
ñol
Fran
ç
ai
s
It
al
iano
Por
tugu
ê
s
日
本 語
Pус
с
к
и
й
中文
ADJUSTING THE PICTURE
• Picture-related items can be set and adjusted in the Picture Adjustment Screen. See BASIC PROCEDURE OF ADJUSTMENT MENU
OPERATIONS on page E-20 for the basic operation procedures.
Adjusting the Signal Contrast
Press
F
to increase the input signal contrast.
Press
E
to reduce the input signal contrast.
Press
<
to store.
Adjusting the Drive Contrast
Press
F
to raise the display’s luminance level, and increase the contrast.
Press
E
to lower the display’s luminance level, and reduce the contrast.
Press
<
to store.
Adjusting the Brightness
Press
F
to increase the brightness.
Press
E
to reduce the brightness.
Press
<
to store.
Adjusting Color
Press
F
to darken the color.
Press
E
to lighten the color.
Press
<
to store.
Adjusting the Tint
Press
F
to change the tint to a more greenish color.
Press
E
to change the tint to a more purplish color.
Press
<
to store.
Adjusting the Sharpness
Press
F
to sharpen the Sharpness.
Press
E
to soften the Sharpness.
Press
<
to store.
Adjusting the Ambient Sensor
Automatically adjusts the Sharpness to an optimized level that matches the brightness of the surrounding area.
Each time
E
or
F
is pressed, the setting is switched.
On < Off
Press
<
to store.
Note
• The screen display disappears if there is no operation within approximately 60 seconds.
• Depending on the model or the optional devices, some of the functions may not be available.
• The adjustment range varies according to the display signals. Make adjustments to your preferred Sharpness within the adjustment range.
• Depending on the type of signal, it may not be possible to make some of the settings or adjustments.
MHD01661-02_E.book 21 ページ 2004年12月22日 水曜日 午後5時15分
E-22), Adjusting the picture (continued), E-22
Page 36
- Image
- Text
E-22
ADJUSTING THE PICTURE (Continued)
Setting Picture Mode
Each time you press
E
or
F
, the available choices appear in the following sequence.
[Natural]: Enables you to watch pictures with natural color tones and high picture clarity. This
mode is suitable for watching a normal motion picture.
[Fine]: Suitable for watching a dark picture such as a movie.
[Effective]: Displays a screen with detailed contrast.
[Conventional]: Displays a screen approximating that of a conventional TV screen.
[Still]: Suitable for viewing a still picture.
Press
<
to store.
Precision Setting (for the U model)
Enables advanced Sharpness adjustments.
See page E-23 for details.
Setting Picture Memory
The adjustment status of eight groups of picture adjustment settings can be stored, enabling you to
quickly switch to your desired group of settings for the picture you are planning to watch.
[Save]: Use
C
or
D
to select Memory 1 — 8. If
<
is pressed, the current picture adjustment
values are stored to the selected Memory.
[Load]: Use
C
or
D
to select Memory 1 — 8. When
<
is pressed, the values becomes the picture
adjustment values stored in the selected Memory.
Picture Memory Selection Screen
“Save” Selection Screen
“Load” Selection Screen
MHD01661-02_E.book 22 ページ 2004年12月22日 水曜日 午後5時15分
Precision setting (for the u model), E-23), E-23
Page 37
- Image
- Text
E-23
Engli
s
h
Deutsch
Es
pa
ñol
Fran
ç
ai
s
It
al
iano
Por
tugu
ê
s
日
本 語
Pус
с
к
и
й
中文
• See BASIC PROCEDURE OF ADJUSTMENT MENU OPERATIONS on page E-20.
Even more advanced Sharpness adjustments can be made as required.
Adjusting the Black Level
Press
F
to strengthen the reproduction of black. (Provides a picture quality with deep blacks.)
Press
E
to weaken the reproduction of black.
Press
<
to store.
Setting Detail Gradation
Corrects the gradation of the light and dark areas of the picture.
Each time
E
or
F
is pressed, the setting is switched.
On < Off
Press
<
to store.
Setting 3D NR
This enables noise reduction processing with respect to the input signal noise level (reduces screen
flicker for more comfortable viewing).
Each time you press
E
or
F
, the available choices appear in the following sequence.
Press
<
to store.
Setting CODEC NR
This enables noise reduction processing of mosquito noise or block noise generated when digital picture
signals are recorded or replayed.
Each time you press
E
or
F
, the available choices appear in the following sequence.
Press
<
to store.
PRECISION SETTING (for the U model)
Precision Setting Selection
Screen
Note
• The screen display disappears if there is no operation within approximately 60 seconds.
• Depending on the model or the optional devices, some of the functions may not be available.
• The adjustment range varies according to the display signals. Make adjustments to your preferred Sharpness within the adjustment range.
• Depending on the type of signal, it may not be possible to make some of the settings or adjustments.
MHD01661-02_E.book 23 ページ 2004年12月22日 水曜日 午後5時15分
E-24), Adjusting the picture (continued), E-24
Page 38
- Image
- Text
E-24
ADJUSTING THE PICTURE (Continued)
Setting Image Enhance
This performs detailed image quality settings.
• Chroma Transient
This function corrects the color contours.
Each time
E
or
F
is pressed, the setting is switched.
On < Off
Press
<
to store.
• Image Identify
This function discerns between the natural image display section and the text display section, and performs correction to enable an
optimized display for each.
Each time
E
or
F
is pressed, the setting is switched.
On < Off
Press
<
to store.
Adjusting the Color Temp.
Use
E
or
F
to specify a desired color temperature. Each time you press
E
or
F
, one of the available choices appears in the following
sequence:
[–3500]: More reddish colors
[+3500]: More bluish colors
[User]: User Color Temp. setup
Press
<
to store.
Setting User Color Temp.
Use
C
or
D
to select Red, Green, or Blue, and adjust the color temp. for each.
Press
F
: to strengthen the selected color.
Press
E
: to weaken the selected color.
Press
<
to store.
MHD01661-02_E.book 24 ページ 2004年12月22日 水曜日 午後5時15分
E-25), E-25
Page 39
- Image
- Text
E-25
Engli
s
h
Deutsch
Es
pa
ñol
Fran
ç
ai
s
It
al
iano
Por
tugu
ê
s
日
本 語
Pус
с
к
и
й
中文
Setting the Color Focus
This enables correction with respect to specific color hues within the image.
Independent correction of the hue of skin colors, blue skies, and so on, enables a more brilliant display.
• [Reddish color]
With red at the center, performs the following corrections with respect to the range from magenta to
yellow.
[Tint]: Use
E
and
F
to adjust the hue.
[Color]: Use
E
and
F
to adjust the color depth.
[Red]: Use
E
and
F
to adjust the strength of the red color range.
[Green]: Use
E
and
F
to adjust the strength of the green color range.
[Blue]: Use
E
and
F
to adjust the strength of the blue color range.
Press
<
to store.
Adjustments can be made in the same way for:
• [Greenish color]: (With green at the center, performs corrections with respect to the range from yellow to cyan.)
• [Bluish color]: (With blue at the center, performs corrections with respect to the range from cyan to magenta.)
• [Targeting Red]
This function corrects the hue and color depth with respect to Red.
[Tint]: Use
E
and
F
to adjust the hue.
[Color]: Use
E
and
F
to adjust the color depth.
Press
<
to store.
Adjustments can be made in the same way for:
• [Targeting Yellow] (Performs correction with respect to Yellow.)
• [Targeting Green] (Performs correction with respect to Green.)
• [Targeting Cyan] (Performs correction with respect to Cyan.)
• [Targeting Blue] (Performs correction with respect to Blue.)
• [Targeting Magenta] (Performs correction with respect to Magenta.)
• [Targeting White]
Corrects red, green, and blue with respect to white.
[Red]: Use
E
and
F
to adjust Red.
[Green]: Use
E
and
F
to adjust Green.
[Blue]: Use
E
and
F
to adjust Blue.
Press
<
to store.
Color Focus (Reddish color)
Settings Screen
Note
• The screen display disappears if there is no operation within approximately 60 seconds.
• Depending on the model or the optional devices, some of the functions may not be available.
• The adjustment range varies according to the display signals. Make adjustments to your preferred Sharpness within the adjustment range.
• Depending on the type of signal, it may not be possible to make some of the settings or adjustments.
MHD01661-02_E.book 25 ページ 2004年12月22日 水曜日 午後5時15分
E-26), Adjusting the picture (continued), E-26
Page 40
- Image
- Text
E-26
ADJUSTING THE PICTURE (Continued)
Making the Progressive Scan Settings
This sets the conversion processing of interlace signals to block receive signals.
• 24 Frame Mode
This function enables the optimized display of movies, etc. with 24 frames/second signals.
Each time
E
or
F
is pressed, the setting is switched.
Auto < Off
Press
<
to store.
• 30 Frame Mode
This function enables the optimized display of movies, etc. with 30 frames/second signals.
Each time
E
or
F
is pressed, the setting is switched.
Auto < Off
Press
<
to store.
• Jaggies Filter
This function alleviates the phenomenon where jagged diagonal lines can be seen when interlace
signals are input, thus enabling a smoother motion picture display.
Each time
E
or
F
is pressed, the setting is switched.
Auto < Off
Press
<
to store.
• Motion Setting
The detecting sensitivity for motion picture is set.
The response of the picture processing is valued in the motion picture priority setting.
Press
F
: to specify still picture priority.
Press
E
: to specify motion picture priority.
Press
<
to store.
Progressive Scan Settings
Screen
Note
• The screen display disappears if there is no operation within approximately 60 seconds.
• Depending on the model or the optional devices, some of the functions may not be available.
• The adjustment range varies according to the display signals. Make adjustments to your preferred Sharpness within the adjustment range.
• Depending on the type of signal, it may not be possible to make some of the settings or adjustments.
MHD01661-02_E.book 26 ページ 2004年12月22日 水曜日 午後5時15分
Comments
Select → I’ve found an manual for my television here! #manualza
Click →
Руководство по эксплуатации — Текущее: AIRSTAGE MINI-SPLITS — Загрузки — Обслуживание и поддержка
Мини-сплиты на одну зону
Настенный
| Модели | загрузок |
|---|---|
| 9ЛЗАС | Руководство по эксплуатации (PDF: 7 004 КБ) |
| 12ЛЗАС | |
| 15ЛЗАС |
| Модели | загрузок |
|---|---|
| 9LMAS | Руководство по эксплуатации (PDF: 6 258 КБ) |
| 12LMAS |
| Модели | загрузок |
|---|---|
| 9RL2 | Руководство по эксплуатации (PDF: 616 КБ) |
| 12RL2 |
| Модели | загрузок |
|---|---|
| 9RLFW1 | Руководство по эксплуатации (PDF: 1,91 МБ) |
| 12RLFW1 |
| Модели | загрузок |
|---|---|
| 9RLS3Y | Руководство по эксплуатации (PDF: 2,93 МБ) Управление кондиционером по беспроводной локальной сети (PDF: 595 КБ) |
| 12RLS3Y | |
| 15RLS3Y |
| Модели | загрузок |
|---|---|
| 9RLS3YH | Руководство по эксплуатации (PDF: 2,93 МБ) Управление кондиционером по беспроводной локальной сети (PDF: 595 КБ) |
| 12RLS3YH | |
| 15RLS3YH |
| Модели | загрузок |
|---|---|
| 18РЛБ | Руководство по эксплуатации (PDF: 1,87 МБ) |
| 24РЛБ | |
| 30РЛСБ | |
| 36RLXB |
| Модели | загрузок |
|---|---|
| 18RLXFW1 | Руководство по эксплуатации (PDF: 995 КБ) |
| 24RLXFW1 | |
| 18RLXFWH | |
| 24RLXFWH |
| Модели | загрузок |
|---|---|
| 30RLXEH | Руководство по эксплуатации (PDF: 6,16 МБ) |
Универсальный напольный/потолочный
| Модели | загрузок |
|---|---|
| 18РУЛКС | Руководство по эксплуатации (PDF: 594 КБ) |
| 24РУЛКС |
Потолок
| Модели | загрузок |
|---|---|
| 36RSLX | Руководство по эксплуатации (PDF: 421 КБ) |
Напольный
| Модели | загрузок |
|---|---|
9RLFF | Руководство по эксплуатации (PDF: 1,93 МБ) |
| 12RLFF | |
| 15RLFF |
| Модели | загрузок |
|---|---|
| 9RLFFH | Руководство по эксплуатации (PDF: 1,93 МБ) |
| 12RLFFH | |
| 15RLFFH |
Кассета
| Модели | загрузок |
|---|---|
| 18RCLX | Руководство по эксплуатации (PDF: 918 КБ) |
| 24RCLX | |
| 36RCLX | |
| 42RCLX |
| Модели | загрузок |
|---|---|
| АУУ18РГЛС | Руководство по эксплуатации (PDF: 3,931 КБ) |
| АУУ24РГЛС | |
| AUU30RGLX | |
| АУУ36РГЛС | |
| АУУ42РГЛС | |
| АУУ48РГЛС |
Компакт-кассета
| Модели | загрузок |
|---|---|
| 9RLFCC | Руководство по эксплуатации (PDF: 5,40 МБ) |
| 12RLFCC | |
| 18RLFCC |
Воздуховод
| Модели | загрузок |
|---|---|
| АДУХ09ЛУАС1 | Руководство по эксплуатации (PDF: 1,34 МБ) |
| АДУх22ЛУАС1 | |
| АДУх28ЛУАС1 |
| Модели | загрузок |
|---|---|
| 9RLFCD | Руководство по эксплуатации (PDF: 4,42 МБ) |
| 12RLFCD | |
| 18RLFCD |
| Модели | загрузок |
|---|---|
| АРУх22ЛУАС | Руководство по эксплуатации(PDF: 962 КБ) |
| АРУ18РГЛС | Руководство по эксплуатации (PDF: 995 КБ) |
| АРУ24РГЛС | |
| АРУ30РГЛС | |
| АРУ36РГЛС | |
| АРУ42РГЛС | |
| АРУ48РГЛС |
Многопозиционный блок обработки воздуха
| Модели | загрузок |
|---|---|
| АМУГ24ЛМАС | Руководство по эксплуатации (PDF: 1008 КБ) |
| АМУГ30ЛМАС | |
| АМУГ36ЛМАС | |
| АМУГ48ЛМАС |
Многозонные мини-сплиты
Настенное крепление
| Модели | загрузок |
|---|---|
| АСУ7РЛФ1 | Руководство по эксплуатации (PDF: 1,91 МБ) |
| АСУ9РЛФ1 | |
| АСУ12РЛФ1 | |
| АСУ15РЛФ1 |
| Модели | загрузок |
|---|---|
| АСУ9РЛС2 | Руководство по эксплуатации (PDF: 2,85 МБ) |
| АСУ12РЛС2 | |
| АСУ15РЛС2 |
| Модели | загрузок |
|---|---|
| АСУ18РЛФ | Руководство по эксплуатации (PDF: 0,99 МБ) |
| АСУ24РЛФ |
Воздуховод
| Модели | загрузок |
|---|---|
| АДУХ07ЛУАС1 | Руководство по эксплуатации (PDF: 1,34 МБ) |
| АДУХ09ЛУАС1 | |
| АДУх22ЛУАС1 | |
| АДУх28ЛУАС1 | |
| АДУх34ЛУАС1 |
Тонкий воздуховод
| Модели | загрузок |
|---|---|
| АРУ7РЛФ | Руководство по эксплуатации (PDF: 4,42 МБ) |
| АРУ9РЛФ | |
| АРУ12РЛФ | |
| АРУ18РЛФ | |
| АРУ24РЛФ |
Компакт-кассета
| Модели | загрузок |
|---|---|
| AUU7RLF | Руководство по эксплуатации (PDF: 5,40 МБ) |
| AUU9RLF | |
| АУУ12РЛФ | |
| AUU18RLF |
Напольное крепление
| Модели | загрузок |
|---|---|
| АГУ9РЛФ | Руководство по эксплуатации (PDF: 1,93 МБ) |
| АГУ12РЛФ | |
| АГУ15РЛФ |
Руководство пользователя Fujitsu P24-9 TE (на английском языке
руководство Fujitsu P24-9 TE
Дисплей
Руководство по эксплуатации
Fujitsu Display P24-9 TE
Посмотреть руководство для Fujitsu P24-9 TE бесплатно здесь. Это руководство относится к категории мониторы, и 1 человек дали ему среднюю оценку 7,5. Руководство доступно на следующих языках: Английский. У вас есть вопрос о Fujitsu P24-9 TE или вам нужна помощь? Задайте свой вопрос здесь
- Дисплей FUJITSU P24-9 TE
- Содержание
- Ваш ЖК-экран…
- Важные примечания
- Начало работы
- Эксплуатация
- Установка драйвера
- Примечания по управлению питанием
- Примечания по USB Power Delivery (USB-PD)
- Примечания по режиму Low Blue Light 90 797 Указания по эргономичной настройке цвета
- Пояснительная информация о стандарте ISO 9241-307
- Поиск и устранение неисправностей
- Технические характеристики
Общие положения
| Fujitsu | |
| P24-9 ТЕ | S26361-K1646-V140 | |
| монитор | |
| 4059595411599 | |
| Английский | |
| Руководство пользователя (PDF) |
Дисплей
| Диагональ дисплея | 23,8″ |
| Тип HD | Full HD |
| Разрешение экрана | 1920 x 1080 пикселей |
| Яркость дисплея (типичная) | 250 кд/м² |
| Время отклика | 5 мс |
| 3D | 90 848 ✗|
| Коэффициент контрастности (типовой) | 1000:1 |
| Угол обзора по горизонтали | 178° |
| Угол обзора по вертикали | 178° |
| Количество цветов дисплея | 16,78 миллионов цветов |
| Собственное соотношение сторон | 16:9 |
| Форма экрана | Плоский |
| Диапазон горизонтальной развертки | 30–82 кГц |
| Диапазон вертикальной развертки | 48–76 Гц |
| Тип панели | IPS |
| Поддерживаемые графические разрешения | 640 x 480 (VGA), 800 x 600 (SVGA), 1024 x 768 (XGA), 1280 x 1024 (SXGA), 1280 x 720 (HD 720), 1440 x 900, 1680 x 1050 (WSXGA+), 1920 x 1080 (HD 1080) |
| Шаг пикселя | 0,2745 x 0,2745 мм |
| Коэффициент контрастности (динамический) | 20000000:1 |
| Поддерживаемое видео режимы | 720p, 1080p |
| Размер видимой области по вертикали | 296 мм |
| Видимый размер, горизонтальный | 527 мм |
| Технология отображения | ЖК-дисплей |
| Сенсорный экран | ✗ |
Эргономика
| Регулировка по высоте | ✓ |
| Регулировка по высоте | 150 мм |
| Регулировка по наклону 9001 9 | ✓ |
| Диапазон угла наклона | -5 — 35 ° |
| Поворотный | ✓ |
| Диапазон угла поворота | 0–345 ° |
| Экранное меню (OSD) | ✓ |
| ARA, CHI (SIMPL), CHI (TR), CZE, DAN, DEU, DUT, ENG, ESP, FIN, FRE, ITA, JPN, NOR, POL, RUS, SWE, TUR | |
| Крепление VESA | ✓ |
Прочие характеристики
| Вращающийся | ✓ |
| Класс энергоэффективности (старый) | A+ |
| Встроенный ТВ-тюнер | — |
| Выключатель | — |
| Адаптер переменного тока в комплекте | ✓ |
Мультимедиа
| Встроенные динамики | ✓ |
| 2 | |
| Номинальная среднеквадратичная мощность | 4 Вт |
| Встроенный встроенная камера | ✗ |
Порты и интерфейсы
| Встроенный концентратор USB | ✓ | Количество нисходящих портов USB Type-A | 3 |
| Количество нисходящих портов USB Type-C | 1 |
| Количество портов VGA (D-Sub) | 1 |
| ✗ | |
| Количество портов HDMI | 1 |
| Количество портов DisplayPort | 2 |
| Тип восходящего порта USB | USB Type-C |
| Количество восходящих портов | 1 |
| Аудиовход | ✓ |
| Аудиовыход | ✓ |
Вес и габариты
| Ширина th (без подставки) | 540,3 мм |
| Ширина (с подставкой) | 540,3 мм |
| Глубина (с подставкой) | 229,3 мм |
| Высота (с подставкой) | 347 мм |
| Глубина (без подставки) | 63,1 мм |
| Высота (без подставки) | 325,6 мм |
| Вес (без подставки) | 3300 г |
| Вес (с подставкой) | 53 00 г |
Мощность
Потребляемая мощность ( выкл. |